
Your e-bike and you - the things the bike shop probably forgot to mention
- Sidetracks Women

- Jun 28
- 5 min read
Your e-bike and you - the things the bike shop probably forgot to mention

A couple of years ago we wrote a post about getting the most from your e-bike battery and motor. It covered the basics well, and you can still read it [here].
But over the past two years, quite a few more things have come up - on our tours, in conversations with guests, and honestly through our own experience. They're the sort of things that seem obvious once you know them, but rarely come with the bike when you wheel it out of the shop.
So this is the first part of what turned out to be a longer story.
Tyre pressure - and why it matters more than you think
Most of us are used to checking car tyres every few months - some of us, honestly, only when the warning light comes on. With an e-bike, it's worth checking them once a week, and always before a longer ride.
An e-bike is heavier than a regular bicycle. Soft tyres on a heavier bike create more rolling resistance, which means the motor works harder and your battery drains faster. It also affects how the bike handles, more than you'd expect.
Finding the right pressure is simple. Look at the sidewall of your tyre - there will be a range printed there, something like "45-70 PSI" or "3.1-4.8 Bar". Aim for the middle of that range as a starting point. Lighter riders can go towards the lower end, those carrying a bit more weight a little higher.
Before you grab a pump though, take a look at the valve on your wheel. There are three completely different types - and this is the bit the bike shop often forgets to mention.

A Schrader valve is wide and short, exactly like a car tyre valve. Most standard pumps fit straight on.
A Presta valve is narrower, with a small nut at the very top that you need to unscrew before any air can go in or out.
A Dunlop valve sits somewhere between the two. It is wider than a Presta valve but usually not quite as chunky as a Schrader valve. It often has a removable inner valve piece and is common on some European-style bikes. Many pumps need the same setting or adapter as for a Presta valve.
If you're not sure which valve your bike has, don't worry. Once you've seen the difference once, you'll recognise it immediately.
A good floor pump with a built-in gauge handles both. Not the cheapest purchase, we'll admit - but over time, absolutely worth every dollar. Two minutes, once a week. Your tyres, your battery, and your bike will thank you.

Putting your e-bike away for winter
Think of it this way: you wouldn't stuff your favourite summer dress into the back of the wardrobe at the end of the season without washing it first. Your bike deserves the same consideration.
Give it a proper clean before you park it up - a damp cloth and mild soap, then let it dry completely before storing. And for the chain - if you've been on one of our tours, you might remember this one: a dishwash brush is by far the easiest and most effective way to clean it. Putting away a damp bike is an invitation to rust, and nobody wants to wheel out a sorry-looking bike come spring.
Once it's clean and dry, a few more minutes:
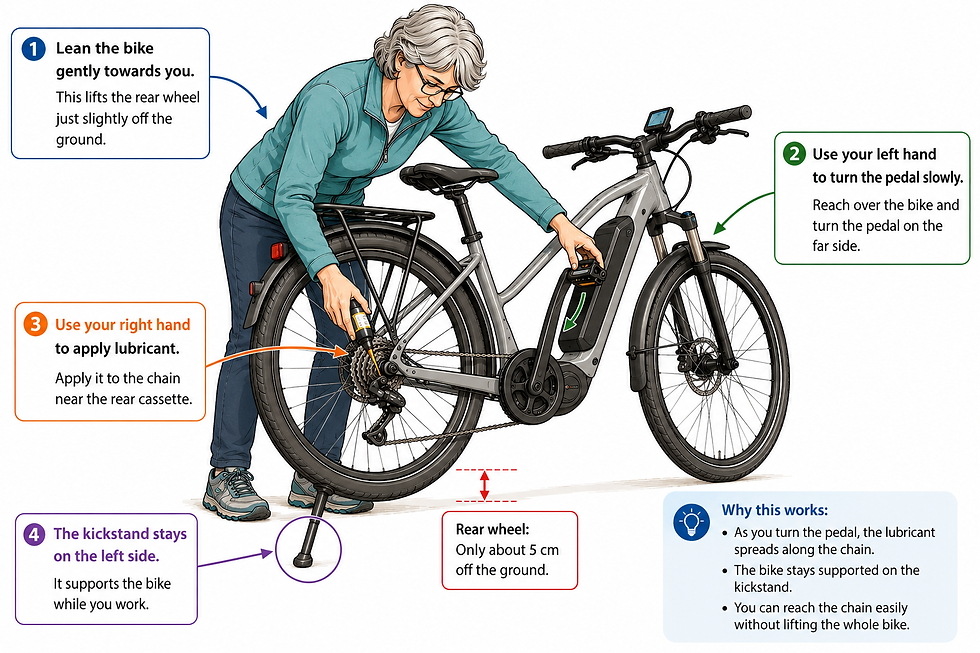
Lube the chain lightly, then turn the pedals to work it through. If you've been on one of our tours, you might remember this one: pop the bike on its stand, stand to the side, lean it gently towards you so you can reach the chain comfortably, and pedal slowly with one hand while you apply the lube with the other. It sounds fiddly the first time. It isn't.
Shift into a middle gear before you leave it - this takes the tension off the derailleur springs over the winter months. Pump the tyres up to the recommended pressure. Give the brakes a quick check - squeeze both levers and make sure they feel firm.
Then find it a dry spot. A garage is fine, just avoid damp corners where condensation builds up. An old sheet or breathable cover over the bike keeps the dust off and gives it a little dignity while it waits for spring.
The dropper post - one thing almost nobody mentions
If your bike has a dropper post - the kind where the saddle drops down at the press of a button on the handlebars - there is one small habit worth building. Always store it fully raised. Not just for winter - any time the bike is parked up for more than a day or two.
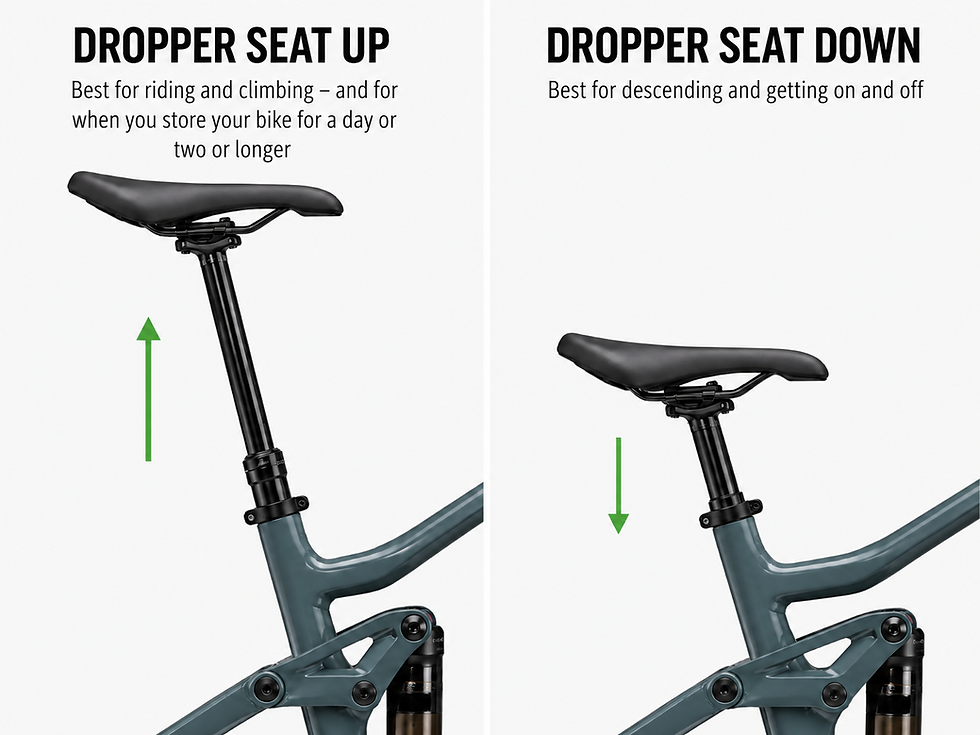
A dropper post works using an internal air spring. When it's fully raised, that spring is completely relaxed - think of it like stretching out in bed after a long day, everything at ease. When the post is dropped, the internal pressure can be up to three times higher. Leave it compressed for weeks or months, and that pressure works constantly on the internal seals. Replacing the seals or servicing a failed dropper post isn't cheap.
I only found this out fairly recently, and I wished someone had told me sooner. It takes two seconds: raise it before you park it.
The battery - the part that deserves the most attention
Your battery is the most expensive component on the bike, and also the most sensitive to cold and to long periods without use. The guidance from battery manufacturers is consistent and worth following.

Store the battery at between 30 and 60 percent charge. Not flat, not fully charged - somewhere in the middle. Both extremes put stress on the cells over time, and that shortens the battery's life.
Temperature matters too. Room temperature, in a dry room, is ideal. A cold unheated garage is not the right place.
If your only option is an unheated garage, placing the battery inside a well-insulated polystyrene box can help reduce rapid temperature changes. It isn't a substitute for indoor storage, but it's certainly better than leaving the battery exposed to the cold.
Check on the battery every four to six weeks over winter. If it has dropped below 30 percent, top it up to the middle of the range and put it back. You don't need to fuss over it - just an occasional check, like watering a plant you're quite fond of.
And when spring arrives: bring the battery inside and let it warm to room temperature before you charge it. Never charge a cold battery straight from a cold garage - give it a couple of hours first. It will reward you with a full, healthy charge.
One last thing
None of this is complicated once you know it. But it's the sort of practical knowledge that often only comes with experience.
On our guided cycle tours, our guides share tips like these naturally along the way - often just when you need them. They're small things, but they can make cycling easier, more comfortable and more enjoyable.
If you're curious about what a guided e-bike tour looks like, you're very welcome to have a look.


Comments